"And hope does not disappoint us,
because God has poured out his LOVE into our hearts by the Holy Spirit..." Romans 5:5

Tuesday, April 29, 2008

Stamp Club THIS SUNDAY, May 4th


THIS has GOT to be the most adorable gift card holder pattern I've ever seen. I got this pattern from SCS. I know how intimidating that site can be (trust me. it took me forever to navigate.) but it can be so fantastic for ideas! Having said that... it can also be time consuming to get onto that or any other stamping website. I have to be very disciplined when I visit. Sooooo... if you would like to but just don't have the time to visit fun stamping websites, let me do it for you! I will share with you what I discover right here on my comfy little blog. Visit any time you like. Email me with your questions or for instructions (a compliment or two from time to time might just make my day, he.) I love to share what I know and thus my Stampin' Up! involvement.

We will be creating this pattern of gift card at our next STAMP CLUB so you won't want to miss it. However, there is a way to get this pattern if you do have to miss club. (Remember, you don't have to be present at every club gathering to be a member.) If you can't make it to this Sunday's club (May 4th) and would like the pattern to this gift card holder as well as the card holder itself, email me RIGHT NOW with your Stamp Club order. I will mail your gift card holder to you. Stamp Club requires a minimum $15 order and you do not have to be a member to attend the fun. Just come! Club is always 2:00 to 6:00pm.

Check out the sidebar here to the right for the CAMP projects we will be creating immediately after club. There are still openings in the camp so RSVP right away! The camp is only $20 and includes all supplies needed for the three projects shown.
Here is a gift card holder using this same pattern I made for my neice who just had her bridal shower this past weekend. It turned out so lovely... just like my neice! I can't believe she is all grown up and getting married. sniff.


Friday, April 25, 2008


Last night's class at Lavender Sentiments was a big hit (with Cindy.) She got the royal treatment with one on one instructions. Our conversations were fun and the paper crafting was relaxing.

These were the two projects we worked on. The gift pail is none other than a vegetable can! What a great way to recycle! They make the cutest gifts and are so easy to alter when you use the Crop-a-dile. It will punch through metal like butter! Do you have a crop-a-dile? Order one today and start saving up those cans! You'll be saving money with not having to purchase little gift packages ever again. (I'm all for saving the green!)

Be sure to check out the next class coming up at Lavender Sentiments. You can see some of the details to the right (here in my blog.) The scrapbook page can easily be converted to a masculine theme. And the "thanks" card can be used for any kind of gratitude (not just for teacher.) Call Lana and RSVP for this class or ask her to email you the entire schedule of classes. The store phone number is (812) 945-0790. You can stop by the store and take a look in person at ALL of the upcoming projects. The store is located at 4510 Charlestown Rd. in New Albany. Feel free to email me with any of your questions.

Monday, April 14, 2008

BUGS and KISSES


This is one of my absolute FAVORITE stamp sets from Stampin' Up!. The bugs are just so stinkin' cute! For this card, I used the Purely Pomegranite TEXTURED CARD STOCK for my base card.
If you haven't worked with this textured card stock, you need to. It is so pretty! You can get them in the assortment pack and let me just tell you... the In Colors won't be here much longer so you will want to stock up now. Can you believe we are in the MIDDLE OF APRIL already?! The current catalog retires in July. That is when we say goodbye for good to these gorgeous In Colors. I am sure the new ones will be just as fabulous but I have to admit this year's have been my favorites.
I used the Fairy Tale and Beachfront Ribbon Originals for my ribbons. I love how the rick rack looks over the ruffly pink! For my cute little "gummy" worm (don't you think he looks like a yummy gummy, he) I used the BABY WIPE TECHNIQUE. This is probably one of my absolute favorite techniques. It is SO easy. Just drop a few REINKER drops onto a folded baby wipe and use this as your "ink pad." The reinkers I used were Rose Red, Bashful Blue, and Certainly Celery. Looks so yummy!
Comfort Chicken
1 lb chicken breast, boneless & skinless, cubed
1/2 C butter
1 med onion, sliced & seperated into rings (I'm not an onion fan so I just used a tsp of minced onion.)
4 med. potatoes, peeled and cubed
1.1/2 C baby carrots (I like to slice these in little round discs.)
1 C whipping cream
1 T dried parsley
1/2 tsp salt
1/8 tsp pepper
In large skillet, cook chicken and onions in butter til lightly brown. Add potatoes and carrots. Cover and cook over med heat for 30 min. or until veggies are tender. Stir in cream, parsley, salt, and pepper. Reduce heat. Simmer uncovered for 10 min. or slightly thickened.
My kids ate this. My husband devoured it. I really enjoyed it but my tummy did not. I am not use to eating the butter/whipping cream type foods. So for those of you with stomachs like mine, eat a small portion. And enjoy!

Please consider sharing your recipes with me. I love getting tried and true recipes. I actually like cooking when I know the recipe has a greater chance of being tastey. Otherwise, I'd rather be STAMPIN'! he.

Friday, April 11, 2008

I just love the stamp set Forever in My Heart by Stampin' Up!! The hearts in this set are so fun and easy to stamp. On this card, I used the "kissing" technique (love when the technique has a fun name like that, he.) I inked the heart in Real Red first. Then I used the check pattern image from All in a Row (another fav) inked in Night of Navy to "kiss" the heart. Next I stamped the heart onto Whisper White and VOILA! Very fun! Very easy!

I am trying a new recipe for dinner tonight. It is from my new cookbook (got it at Christmas from my sweet hubby.) The Graceland Church youth group sold them as a fundraiser. I LOVE LOVE LOVE church cookbooks! This one is so great because it is three-ring bound and has a TON of recipes. It even has a recipe for PLAY DOUGH. Talk about fun! I will post the recipe tomorrow if the family enjoys it.

Wishing you and your families well!

Sunday, April 6, 2008

Classes at Lavender Sentiment Scrapbook Store


This Thursday, April 10th at 6:00pm you can create these two lovely projects at Lavender Sentiments Scrapbook Store on Charlestown Rd located near the Spaghetti Shop across from Northside Christian Church.


Most supplies are included in the class fee of $12 and you will need to register by contacting Lavender Sentiments at 945-0790. For other class times and descriptions, email me and I will send you a copy of the store newsletter.


The projects we will create at this Thursday's class would be perfect MOTHER'S DAY GIFTS. There are all sorts of 12 x 12 page frames and this "Bloom" page will look beautiful with any photos. And what perfect way to wish Mom (or any special gal) well than to bless her with this card that reads "May God's everlasting love bring you everylasting joy."


Thursday, March 27, 2008

Shout Out with WHISPER White


Whether you are a card maker or a scrapbooker or both, there are three essentials to making a card or page really "pop." One is BALANCE (or layout.) One is COLOR. One is DIMENSION. I guess you could call these the B, C, & D's (instead of the ABC's) of paper crafting. Although I am normally drawn to cards created with colored card stock, lately I have been having fun working with my Whisper White card stock alone. It's been a fun challenge to see just how eye-pleasing I can make a card seem by forcing the COLOR essential of my card to flow only through my inks. I must say I like the end products. I can focus on different techniques to create a "wow" factor.


These cards can be created at my next Stamp CAMP this Sunday from 6:30 to 8:00pm. The class is only $10 for all five cards. All supplies are included. You must register by emailing me by Saturday evening (no later than 6:00pm.) I will show you how to incorporate even more color to these Whisper White greetings so you will certainly want to be there!


The above card was created with the rainbow brayer technique. Two-Step Stamping is the feature that creates dimension for this card.

The Thanks card above features a sponging technique that incorporates the scallop punch as well as the large circle punch.

This card gets it's dimension from the color spritzer as well as some added grosgrain ribbon.


This card is quite possibly my favorite. The scallop punch and two circle punches along with some sponging help create the dimension for this card.

Hope to see you at the CAMP!


Wednesday, March 19, 2008

All for Love


Happy Easter everyone!
May you truly know the love of Christ and understand He did it ALL for YOU.
God's blessings.
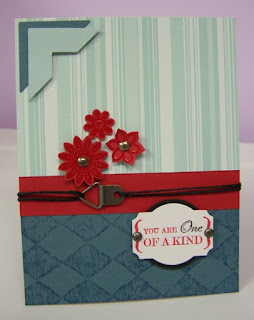
Aren't these papers fantastic?! I used Bali Breezes Designer Series Paper from Stampin' Up! and just love how this card turned out! The stamp set I used is One of a Kind with matching Boho Blossoms Punch. So pretty! Hope you like it!

Here is an extremely yummy recipe shared with me by my friend, Vonda. Thanks, Vonda! It was so good! I can't wait to try new combos.

Crawler Cake
one boxed cake mix
one tub of frosting
4 eggs
1 C whole milk
1/4 C oil

Mix all but frosting together till just blended. Mix in frosting. Don't overmix or cake will "crawl" out of pan. Pour into a greased and floured bundt pan. Bake 1 hour at 305 degrees. No need to frost... it's in the cake!

I used Carrot Cake and Cream Cheese Frosting. I will check the recipe and edit my post with the combos Vonda used. Thanks again, Vonda! I love getting tried and true recipes.

Friendship makes me so very happy! Did you know you always have a Friend seeking your friendship? He gave His life for you. I'm speaking of Jesus Christ. This Sunday, my family and I will celebrate His being raised from the dead. His resurrection proves for us we will live forever with Him in Heaven. What a glorious promise! I believe what I believe because of what God's Word, the Bible, has told me. The Bible is a proven to be true history book full of facts and instructions that can benefit any life. If you would like to know more about my Friend (and yours), Jesus, by studying His Word on a regular basis, please email me. I would love to invited you to my Bible study. You do not have to live in my area. Email me for more information.
This is such a very cool technique! It's called "faux cor-something," he he he... I've never heard of it so I can't remember the name completely. What I do remember is it is super easy and creates an amazing effect. Here is how you achieve it...

1. Using Versamark, stamp a LINED IMAGE stamp on magazine paper (a page from any old magazine.)

2. Cover with gold embossing powder. (I used silver in the above project and gold in the ones below.) Heat image.

3. Trim image from magazine paper and adhere to card. Done!

How easy is that?! And the effects are SO different and unique. I love it! How about YOU TRY IT and share your results with me. Email me a photo of what you come up with. I just love when others share their ideas with me. And tell me which of these three cards you like the best. I will tell you my fav when I hear from lots of you first.
:-)


Monday, March 10, 2008

So Easy a Kid Can Do It...

Yep! Rubber stamping is for EVERYONE! My sweet daughter created this adorable card (without much help from me at all) for her annoying (as she would put it) yet adorable brother. We just celebrated his 9th birthday! Yikes! I honestly can not believe it!

She told me exactly what she wanted the card to look like and I selected the stamps for her. Ohter than that, she ran with it. I love how she used the retired paper peicing punch from Stampin' Up!. And By Land is really one of my all time fav stamp sets. I'm so glad I got it before it was retired! (Just another reason to invest, stampers, while you have the time. wink)

Now just look at these adorable "thank you" notes my son put together (mm-hm, WITH my help... let's face it, he is a typical boy. He talked about Star Wars the entire time we stamped.) He had in his mind who each card would go to as he stamped it. I just love that! It's like he was saying little prayers for that particular person as he made their card. Precious!

So get busy with those kids and LET THEM STAMP!


Friday, March 7, 2008

Hodgepodge 101 Stamp Camp


Hodgepodge is one of my absolute FAVORITE tools for embellishing. I love to find all different sorts of ways to use it other than the typical. And thanks to Stampin' Up!, you get a MAJOR BARGAIN with this hardware. I've not seen anywhere else so much metal for such a great price. Honest!
When you purchase Hodgepodge Hardware from me now to the end of April, you can attend my Hodgepodge Hardware Stamp Camp for FREE. That's right... absolutely FREE. You will be using your hodgepodge in the class while all other supplies will be provided. Stampers not wanting to make the investment in a purchase of Hodgepodge can still attend the camp for only $15 (all supplies provided.) NOW is the time to grab some Hodgepodge since it is still SALE-A-BRATION! When you purchase $50 in SU! product, you can select a free set of stamps or rub-ons from the SAB catalog. FREE STAMPS AND A FREE STAMP CAMP... does it get any better than this?!
Register for this camp by emailing me with your order or by sending your camp fee through the mail. Email for my address.

Gift Set


Saturday, March 1, 2008

Surprise! Time is running out...


Time is running out for SALE-A-BRATION with Stampin' Up!! You only have a bit over two more weeks to join in on this celebration and get FREE STAMPS. This cute little "pop-up" card was made with the Sale-a-bration set "Whimsy Birthday." I just love this little 3x3 card! It's perfect for anyone's big special day. And best of all... the stamps were FREE.
Call or email me today to place your $50 order and select your FREE STAMP SET or your FREE PKG OF RUB-ONS. Click here to browse through the Sale-a-bration catalog. Remember, SU! catalogs aren't just catalogs... they're IDEA BOOKS. You will receive a free catalog along with your order. Have some freinds you stamp with? Get a $150 order together between you and your stampin' pals and you get THREE (3) FREE Sale-a-bration stamp sets PLUS... A FREE SET OF HOSTESS STAMPS AND $15 IN SHOPPING DOLLARS. Now that's fun with your friends!
Banana Pudding
OMGoosh! Before last Tuesday night, I had NEVER made banana pudding in my entire life. I don't really like banana pudding so why on earth would I make it. he he he... ick. Soooo... my sweet little daughter loves Vanilla Wafers. She doesn't really like any other kinds of cookies. The last TWO BOXES I opened for her had nothing but BURNT WAFERS inside! Yikes! (I'm definately emailing the Keebler!) So, I figured I'd save the wafers for a "pitch in" somewhere in the future and use the wafers to make Banana Pudding then. No offense to the host of the pitch-in, he he he... I just figured we adults could handle a few burnt cookies, right? Besides the pudding would surely overpower the burnt offering (so to speak. he.) Well! Tuesday night was my opportunity to rid our household of the burnt sweets. Only one thing... I had no recipe for Banana Pudding. I had no idea how to make the stuff! And I waited until Tuesday afternoon to make it! Ikes! What was I thinking?! Well, this was one time NOT thinking actually did me some good, he he he... I "dogpiled" Banana Pudding and O... M... Goosh! This recipe is now one of my ABSOLUTE FAVORITES!!! I guess perhaps I should go easy on Keebler when I email since if it weren't for the burnt sweets, I wouldn't have this amazing Banana Pudding Recipe. he. Hope you enjoy it as much as Dean and I did! Let me know what you think. Either leave a comment or email me. And thanks for looking!
2 (3.4oz) pkgs. instant vanilla pudding mix
1 C milk
1 (14 oz) can sweetened condensed milk
1 (8oz) container of sour cream
1 (8oz) container frozen whipped topping, thawed
6 bananas, sliced (I only had four.)
1/2 (12oz) pkg. vanilla wafers (I think I used a bit more.)
In a med bowl, combine pudding and milk. Stir til mix is dissolved. Refrigerate 15 minutes, until partially set. (Remember I said I waited till the last minute so I didn't do the refrigerating step.)
Stir milk into pudding til smooth. Fold in sour cream and topping. Fold in bananas.
Make a single layer of vanilla wafers in the bottom of a 9x13" pan. Spread pudding evenly over wafers. Crush remaining wafers and sprinkle on top. Refrigerate til serving.