One of my favorite traditions about the Christmas holiday season
is all of the yummy yummy family recipes!
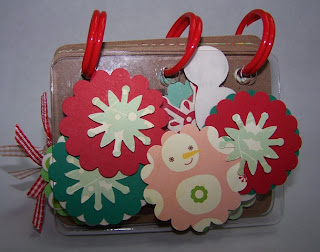
I decided to create a little mini album full of all of our favorites.
*
I used the Mini Flip Cover 2 Cover acrylic album from
MOSD.
(Psst... Lavender Sentiments lovers...
talk to Lana about getting some MOSD goodness in the store.)
*
As you can see, the front and back covers are acrylic pieces.
I love how my the fun colors and patterns of my pages
show through the acrylic panels!
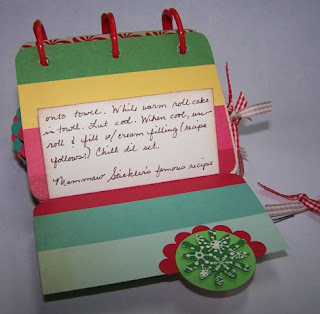
The pages of the album come in thin but sturdy card board.
*
Covering each page was a cinch!
I cut my patterned paper to measure
the same width as my album page.
Then I cut it the length I wanted it so that it would
fold up without getting in the way of my three punched holes.
*
The little inside piece that holds my recipe
measures a perfect square so I can easily fold it in half.
*
I used my Stampin' Up! punches to decorate my tags.
*
I tried to keep the majority of my recipe on the
inside portion of my tiny card stock.
I wanted the outside to be saved for some
fun fact about the recipe.
*
I used regular paper clips embellished with some
lovely Stampin' Up! gingham ribbon.
*
The Mini Flip album by MOSD
comes with the three holes punched and black rings.
I switched out the black rings for some red ones.
Festive, yes?!
*
Once I trimmed my patterned paper to size,
I adhered it to the album page
and trimmed the excess so my corners were rounded.
*
I used my own handwriting but
you could always use a computer font if you prefer.
I personally love handwritten recipes.
Those are ones that are usually "tried and true"
so you know they are going to be oh-so-yummy.
Not to mention, I enjoy how seeing people's handwriting
makes our memories recall that very person.
Isn't it true?
When you see your mother's handwriting,
don't you immediately think of her?
Or when you see your best friend's handwriting,
aren't you flooded with cherished memories?
I love that!
*
I sponged my tags as well as my recipe cards
to coordinate with this fun and yummy patterned paper.
Creamy Carmel was my ink of choice for this task.
It always gives such a warm and lovely "warn" look.
*
The chipboard sticker pieces coordinated with the paper.
If you know me at all,
you know I am a sucker for coordinating paper crafts.
That is one thing I love most about Stampin' Up!...
everything coordinates!
Makes things so much easier.
*
This will be my last post for the year.
I plan to take the rest of the year
and simply enjoy it with my family.
Be sure to check back in on January 1, 2010
when I have a brand spankin' new
MOSD
project for you to check out and be inspired by.
*
Until then,
I wave good-bye just like this adorable little snow person.
he he he.
*
Merry Christmas!
And may the true Reason for the season
open your eyes to the depth of God's blessings.
*
THE END
(for now)

