"And hope does not disappoint us,
because God has poured out his LOVE into our hearts by the Holy Spirit..." Romans 5:5

Sunday, February 28, 2010

Scrapbooking Tips


TIP TIP TIP
Most scrapbooking experts will encourage you
to USE YOUR OWN HANDWRITING.
To speed up my scrapbooking process
and finish as many pages as possible,
I will use my own handwriting,
not only in my journaling, but in my title as well.
*
Here's a tip for you if you don't like your handwriting...
when scrapbooking with a friend,
ask her (or him) to write something for you
(as long as you admire their handwriting, that is.)
Provided you don't ask them to write a novel,
I am sure they would be
more than happy to push your pen!
*

TIP TIP TIP
Squeeze it in!
Most scrapbook pages I see online
or in scrapbook magazines/idea books
always seem to sport only one photo.
Are you kidding?!
I have so many photos I want to cherish
and so many memories I want to keep.
I would have a gazillion albums
if all of my pages had only one photo on them!
*
Trim and tilt one or two photos
to "squeeze them in" and onto your page.
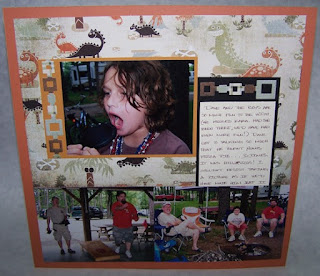
You can see I've done this to both pages above and below.
This will actually add dimention to your page.
It's fun too!
*

Sunday, February 21, 2010

Scrapbooking Tips


TIP TIP TIP
Most scrapbookers already know this tip
but I believe it's well worth repeating.
Use up those sticker letters!
I love the sheets of BIG sticker letters
but most of the time there is only one of each letter.
You can trim most any letter to create
the letter you need for your title.
Notice below how I trimmed a "C"
to create my "U" in the word "FuN."
*

Sunday, February 14, 2010

Scrapbooking Tips


TIP TIP TIP
Flip it!
I love to visit Triple the Sketch or Page Maps
when I am scrapbooking!
By utilizing skeleton sketches (black & white layouts,)
I can use one sketch and "flip it" four times
to create four different pages and looks.
Talk about speedy scrapbooking!
*
Notice how these two pages are pretty much the same.
The page above has two photos at the top
while the page below has two photos at the bottom.
The single photo above verticle with the page
while the photo below is horizontal.
The journaling block above is coming from the single photo
while the block below is coming from the two photos.
Otherwise, everything is the same.
*

Sunday, February 7, 2010

Scrapbooking Tips


TIP TIP TIP
USE THAT DECORATIVE PAPER!
Many decorative papers can be used for
many different themes and photos.
Take a look at this decorative paper.
It's neither masculine nor femanine.
The colors work well for just about any theme.
Even if your photos are not from the same event,
the same decorative paper can be used for
several pages continuously and still look very nice.
When I use the same paper on several pages,
my work area stays cleaner longer
which allows me to work more efficiently and quickly.
*

Tuesday, February 2, 2010

Still Celebrating 20 Years!


*

To continue my celebration of
TWENTY YEARS
with my best friend,
I've created him a little photo pocket card.
*
Notice how the adorable little cards
just tuck right into the pockets.
How cute is that?!
*
This photo pocket card was created with
just ONE sheet of 12x12 patterned paper.
It's a cinche to create!
You will want to check out my
Always Stampin' blog soon
for the instructions on how to make your very own.


I just love what these little cards say!
*

Very appropriate...
since he IS my best friend!
*

I'll be makin' his absolute favorite dinner...
Spinach Manicotti
and Carrot Cake
(well, I just might have to grab some help from
Sweet Stuff in New Albany on the Carrot Cake! he he)
*

And he just gets sweeter and sweeter!
Here's wishing you a sweet day!